Installation guide
- Please view photo guides Fig 1 and Fig 2 further down this page in conjunction with this written guide.
- Isolate water to flush tank and mark position on water feed pipe (A) where you wish to fit the 15 mm compression Tee with Female Iron (B).
- Cut water pipe (A) with pipe cutter and remove a 20mm section to allow fitting of the 15 mm compression Tee with Female Iron (B).
- Fit 15 mm compression Tee with Female Iron (B)and tight olive nuts on water feed pipe
- Put 15 rounds of PFTE tape on the inlet thread of water isolating valve (C) and screw and tighten into Female Iron of the 15mm compression Tee (B).
- Connect shower hose (E) (the end with the standard 1/2 BSP nut not the end with the taper nut as this is fitted to the shower head ) to outlet of water isolating valve (C) ensuring you fit the 1/2 inch neoprene sealing washer supplied with the shower kit and nip tight .
- Connect shower hose (E) (the end with the taper nut) to Bidet shower head (d) ensuring you fit the 1/2 inch neoprene sealing washer supplied with the shower kit and nip tight.
- Position and mark the wall bracket (F) at a suitable height and position that can be readily reached whilst sitting on toilet. Drill 2 x10mm holes in wall (check position you intend to drill does not have any pipes or cables buried beneath the wall), using wall plugs and screws provide fit wall bracket firmly to wall and place shower head in bracket.
- Turn on mains water and check for any seepage or leaks around any joints, tighten as required. Open water isolating valve (C) , discharge shower into toilet bowl.
- Please be advised we can supply 15mm Compression Tee's with Female Iron (B) and anti-syphoning Valves (G in Fig 2) if required.
- Note: If the bidet shower head can accidentally come into contact with the water in the toilet bowl an anti-syphoning valve must be fitted to prevent syphoning of toilet water back in to the mains supply (see Fig2). All installations must comply with your applicable local water authority regulations. If you are unsure regarding any matters contained in this guide please consult a qualified plumber.
- Remember: always turn the water isolating valve off after each use of the bidet shower and relieve the hose water pressure into the toilet bowl, this will also help prolong the life of the shower
Fig 1
A: Water feed pipe to toilet flush tank
B: 15 mm compression Tee with Female Iron
C: Water Isolating Valve
D: Bidet Shower Head
E: Double lock stainless steel shower hose
F: Wall bracket for holding shower head |
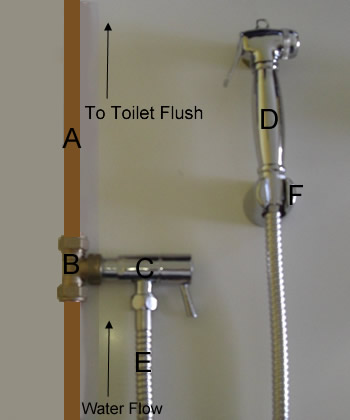 |
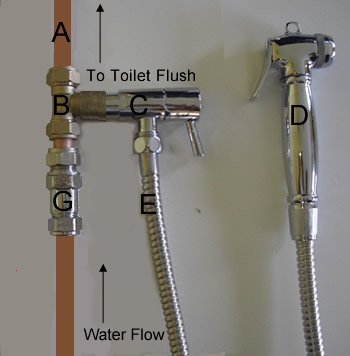
Fig 2
A: Water feed pipe to toilet flush tank
B: 15 mm compression Tee with Female Iron
C: Water Isolating Valve
D: Bidet Shower Head
E: Double lock stainless steel shower hose
G: Cateqory 5 Anti-syphoning valve.. Mandatory if the shower head can come into contact with the water in the toilet bowl, prevents syphoning of toilet water back in to the mains supply should the shower head fall into the toilet bowl. |
 |
Click here to order or request further information
Click here to close this page
|

|

